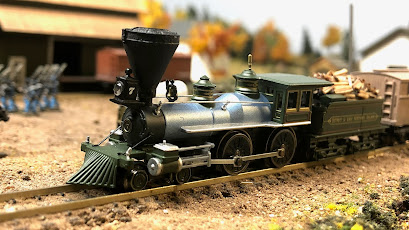
It's a big deal whenever a new engine joins the roster, so this post is a big deal. There are usually about three to five Civil War era Atlas 4-4-0's on eBay at any given time, but they're almost always overpriced, at least for my wallet. So when a locomotive is available and in my range, I have to pounce.

|
Newest addition to the roster:
Atlas 4-4-0 #7 of the Detroit & Lima Northern. |
That's what led to the No. 7 being purchased. It's got a great Russia iron boiler jacket, and has minimal ornamentation. The latter is perfect for when I can repaint it. I don't have any engines with mostly blue livery yet. The No. 7 should look great. I picked up some new paints recently and the color scheme was definitely incorporated in that.
 |
| One of the B&O twins is now the USMRR Clarke. |
Speaking of paint, after a horrible misstep (more on that later), I was finally able to paint and decal one of the B&O twins and make it the USMRR Clarke. I'll have to figure out a better solution for covering the number plate on the boiler, and the drivers will need some paint work. But overall I'm very happy with this one.
This was also one of the engines I wanted to experiment with Bullfrog Snot. You saw the video of the Scout pulling 27 cars after getting the treatment. Here's a pic of the Clarke under the knife a few weeks back. It's a very easy process, but tough to truly master right away. Practice makes perfect.
 |
| New kicks. |
But before all this, there was a disaster. I had rubbed off as much of the old lettering as I could, painted the tender and old name plate under the cab window, and added new decals that very closely match the original Clarke. Then came the clear coat of spray. UGH! I was too heavy on the first coat. The decals degraded and smudged. All that work, about four hours, down the drain. Some people I talked to online said it could have been the decals. They were an old sheet, so it's possible.
 |
| The moment I was ready to scream. |
Now for the buildings. It's easy to get too heavy with the non-dwelling structures, so I tracked down some houses that fit the era. You wouldn't believe the amount of time I spent debating what color to paint this first house. Most wood houses were white because that's what was cheap. But I needed something else, so a nice yellow with dark green trim was the choice. The roof was simple black paper, weathered with some diluted white paint. It may not be completely accurate for the period, but I don't anticipate many stitch-counters visiting my layout anytime soon. The second house is a simple white farmhouse, similar to what you'll see across many battlefields. I might add a stone faux-foundation to it using a stone pattern printed on paper and wrapping it around the pylons.
 |
| Typical house that could serve nicely in the Civil War era. |
The last building is sort of a kit-bash, even though I didn't actually bash two together. Ok so it's more like just a modification of a kit. Anyway... this was my first experiment with covering a building with paper to give a non-wood exterior. This one was brick. It's the same Micro-Trains co-op kit that was painted green and you can see in the background of all these photos. I covered a few of the windows, and did not add the loading dock or subroof. I did move the loading dock bay door down to ground level, which was very easy since the original door opening is now covered by the brick paper. Looks pretty good, but I can't put it on the layout as it stands right now. It's too noticeably-similar to the green building. But it'll fit nicely when I can build the bigger shelf layout with several "towns" or whatever they'll be.
 |
Sort of a kit-bash. Changed up some of the doors and windows,
and added a brick exterior to the Micro-Trains co-op. |
Since I'm not building that shelf layout for at least another 18 months, I'll keep working on the current layout to hone my amateur skills. Here's an overhead shot of the area I plan to work on. The wagons and escort are where I plan to build a road, bordered by either fences or stone walls. The 32-pounders are just too great to leave off the layout. Even if they don't exactly fit what I'm portraying here--What exactly am I portraying here anyway? I have no idea!--I'll need to construct some kind of earthen fortifications straddling the road. If I put the guns emplacements a few inches more to the left in this photo, that should look a little better than them being right on the little farmstead. Plus, if I can get a "fort" scene going on, that'll open up a ton of new possibilities for scratch building, like chevaux de frise, which I've been itching to build.
 |
Needs... more stuff.
|
I'll have a new update sometime in the next few weeks. Stay tuned.


