Showing posts with label track. Show all posts

Tuesday, January 10, 2023

Aaand It's Gone: Modern Layout Scrapped, Preparing for THE ONE

We barely knew thee.
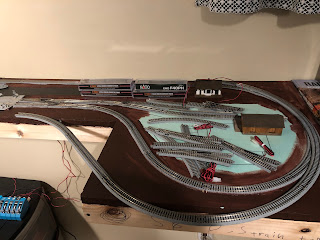
The decision came swift and sudden. Once the modern layout was brought from the garage into the new basement, I realized it just wouldn't fit right and I'd be wasting time, effort, and resources trying to make it work. So we stripped it of trees and as much of the bushes I could scrape off, tore up the track, and now it's back in the garage awaiting final disassembly. I plan to salvage the wood. Probably a good 90 percent of the boards and plywood can be recut for the new benchwork.  

As a final farewell, here are a few photos of the layout as it stood just prior to early retirement. The only place I could set it up was on the basement countertop. But as you can see, the shape of the layout caused it to stick out awkwardly with the entire side of the hill exposed. I briefly considered trying to just store it or sell it. But both those options were bad and just me trying to avoid making the right decision. 

All that being said, now is the moment we've been waiting for since we started our model trains adventure almost five years ago. It's time to start planning the The Layout, our Civil War Era N Scale Train Layout. It's almost unreal to say that. I'm a little nervous because I don't want to make too many mistakes this time around.

All the modern equipment we've gathered over the last two years will be put to good use, however, in quick temporary layouts to have fun while we work. I also plan on using the modern era equipment to run a nice circle around next year's Christmas Tree. Building a platform for that should be fun. 


Thursday, August 18, 2022

Modern NJ layout: Curves fixed, factory built

 Once I made the switch to a modern-era layout set in New Jersey, I ran into the problem of curves being too tight for longer passenger cars like the NJ Transit coaches. After some unexpected construction and a few purchases of wider radius curved track, the issue is resolved as best as I could hope for. The only other option was to tear up most of the foam and completely rework the frame. That wasn't going to happen. So here we are. 

The track realignment was really stressful, having to add extensions to the "east" end of the layout and fill in the angle inside the squares. You can see the old curve inside the new. It's not a small correction. 

Old curve with new curve on top.

Track ripped up. 

Adding the new expansions consisted of cutting new frame pieces and some new plywood that hugged the planned curve. Took about a day to complete, using leftover foam chunks on top. The other addition here was to go with a double track mainline. I figured since I had the space now, why not allow space for a full freight or passenger train to bypass the other. Ultimately, I'd like to add separate power to the inside line and allow for independent operations within that, including the industrial area. 

After adding the new expansions and the first plaster cloth application.

I spoiled the building reveal with that photo, but it's actually the only one I took of the new section before more was added to the scenery. The double main line will be very nice and give much more depth to the layout and operations. 

Factory

Back in November, we picked up a Walthers George Roberts Printing Co. building set at the Edison train show. This spring I finally got started on it. It was surprisingly simple to construct and took about three days from start to finish. And that was only because I had to wait overnight for some of the big glue phases to dry before moving onto the next. 

Sprayed white, with dry-brushing brick. 

Since I wanted the brick to have the older look, I sprayed the base white as the mortar before using a dry-brush technique for the brick color on top. I had to be much heavier with the brick color than I thought. The concrete sections used a dark gray color. I debated whether to use a more tan/beige color, but the gray worked out just fine. I thought the red fire exit doors came out pretty cool in contrast to the rest of the building. 

Finished factory. 

Those trailers are about 40 years old, and too short compared to
modern 53-foot trailers. But they look cool. 

I've got a backlog of updates to post. Just have to write them out and get photos together. Expect another post next week that includes adding real roads and more scenery to the central and eastern portions of the layout. 

Tuesday, May 17, 2022

Crap! Crap! Crap! The Turns are Too Tight

There comes a time in every project when you realize something is wrong. This time, it's really wrong. Catastrophically wrong, one might say. The turn radius on the layout are too tight for the modern passenger coaches. The Amtrak coaches made it through fairly well, but the new NJ Transit double-deckers simply cannot make the turns. This has forced a major shift in the track plan, which I'll explain below. 

As for the title of this post, yes, it should be sung to the tune of "Tramp! Tramp! Tramp!"

The Eastern Curve that's too tight. The NJ Transit
coaches derailed constantly.
These curved track sections are the tightest radius Kato offers that are meant for standard trains. The problem seems to have been that I originally built this benchwork thinking the biggest rail cars would be the 47-foot Civil War era coaches. Then once I switched to a modern era layout, I forgot the turn radius would be too tight for the much longer modern coaches. 

The Eastern Curve at the necessary radius, much
larger than the current benchwork.

You can see how much wider the curve radius will have to be to comfortably accomodate the modern era coaches. There's not much choice here but to add on "wings" of some kind to widen the surface area on which to build this new track plan. I'll also have to purchase additional track, as I only have the wider turns from the original M2 Kato set, which we want to save separately. 

The Middle Inside Curve, also too tight for the NJ Transit coaches.
I'll have to rip up much of this.

The middle inside curve area just down the line from the trailer yard was also too tight for the modern coaches. This will have to be ripped up and realigned with a wider radius curve. I'm really upset about this part, due to all the ballast I set down for the yard area. That's going to be a real pain to remove. My estimate is that the new track will have to shift right down the middle of these two current tracks. But I'm not sure yet. 

Somehow, the outside/farside curve is not having any derailment issues with the new coaches, despite being the same radius. My conclusion with all this is that the turn radius would have been tolerable is laid down exactly perfect, but they must have been just a degree or two too tight. The tunnel is a similar situation, where I could "untighten" the curve inside the tunnel and the coaches seem to do alright. 

This is so frustrating. But as I've said continuously through this process, I'm learning so many hard lessons that I really don't want to have to learn during the Civil War era layout down the road. That layout will have to be near perfect and I can't afford any screw ups like this. 

Photo Time

I do work on some small side projects from time to time. This one is a new wood load for the DC Atlas 4-4-0's. It looks much cleaner than the previous wood load, and hides the tungsten putty very well. 

New tungsten-weighted wood load on the Scout.


Tuesday, January 25, 2022

Modern-Era shelf layout: Big scenery update, trailer storage yard, ballast

 I'll have to finally come up with a better name than "tunnel hill" now that it's pretty much finished. Can't be confusing people since this is a blog titled Civil War Trains in N Scale. But it's done, with the interior of the tunnel painted and closed up from behind, and ballast along the track into the tunnel a bit. I realized after the fact that I should have added walls into the tunnel for at least the first few inches to simulate a tube. I can live with this. And again, this is all a learning experience for me. Small mistakes are fine. 


The open flat area below the tunnel will be residential lots. I'll need to build that later as I don't have enough or accurate houses right now. 


Tractor-trailer storage yard

The biggest addition this round is the landscaping and terrain, and the tractor-trailer storage yard. You can see a bunch of photos below. The first is the Susquehanna "SU-100" coming into the yard area from the "west," through the cut that separates the hill section from this new section. 

The "eastern" half of the new section features two rises in elevation to help add another break in the scenery before the approach to the downtown area and commuter station that'll come in the next few months. Here there are three tracks. The mainline to the station is in the middle. The passing/freight siding is on the bottom. And the reverse mainline is on the top and ducks behind the hill. 

Here's a look at the whole trailer yard. Once I get some actual trailers, it'll look good. There was an issue on my first attempt, however, as I used Woodland Scenics gravel for the lot surface. Those rocks were far too large. You can see some of them popping up from underneath the current surface. For this I used the WS fine ballast. It look almost perfect as a gravel lot surface. I plan to hit it with a little light paint to  give the effect of the truck paths. The chain-link fence adds to the little details that make a huge difference. 

I'll need to find houses that look better than the 40-year old Plasticville stuff. But you get the idea. 

A top-down look at the railroad cut on the western approach to the yard section. At first I wasn't sure how good this looked, but now I'm starting to come around. I really need to pain the wall blue or something. 

The next post will swing back to the original mission of this blog: The American Civil War. See you then. 

Wednesday, January 19, 2022

Modern-Era shelf layout: Tunnel hill construction near complete

This is the biggest scenery build I've ever done. It's not very impressive to serious model railroaders, but for us it's a big step in learning. The foam was relatively easy to work with, and reduces the weight by a significant margin compared to the old layout that used much more plaster and heavier wood. 

Tunnel hill skeleton prepared for plaster cloth.

Two things I forgot to do: paint the foam before the plaster cloth and add more than one layer of the plaster cloth. This would have reduced the need for more paint and ground foam later. But the section came out really well. It still needs some detailing, like inside the tunnel and additional coverage touch-ups. The tunnel portals look good, though I should have raised the ground level around the tracks before installing them. Trains clear just fine, but for realism purposes, it would've looked a little better. 

Tunnel hill 95% complete.

Those are real New Jersey rocks above and around the tunnel portals, along with some real dirt along the track bed. I still need to ballast the track, which will help a ton visually. 

Monday, December 13, 2021

Edison, NJ train show, Nov. 2021

Took the boys to their first train show, the Greenberg Train Show on Nov. 28 in Edison, NJ. I hadn't been to one in many years, decades in fact. It was a real treat and we had a great time. The Edison expo center was huge, with an entire wing dedicated to the big layouts that you can see in the photos below. The Jersey Central N-Trak club was there with an "M" shaped modular layout. It also included a module of the USS New Jersey (BB-62), which was very cool and the 10-year-old in particular loved.

The main area of the show was full of stuff to buy, which was one of the main reasons I wanted to go, to pick up some "show priced" pieces.  As you might guess, a good 60% was O scale/Lionel, but about 10% was N scale, which was still a ton of inventory to look through. We came away with several modern era freight cars, a building that could pass for Civil War era, tunnel portals, and a modern era factory/industrial building. 

The trip was a success in all ways.

The huge N scale staging yard.

USS New Jersey (BB-62).

The boys admiring the N scale layout.

This was just one part of the layout area. 

Thursday, December 2, 2021

Shelf layout progress: Tunnel hill, final track configuration, No. 4 switches

Slow and steady goes the shelf layout. The foam board is now on. Track is set with one portion glued down. And I'm starting to build up the one section where a tunnel will go through a hill. Using Kato Unitrack has been a revelation, even if I'm probably not utilizing it to its fullest potential by mapping out the exact pieces ahead of time. This has been a trial-and-error endeavor, which has taught me a bunch about using space and other things I can't get without just doing it. 

The future tunnel hill. 

The Tunnel Hill section is something I was debating as an option for the northwestern portion of the layout, as I didn't want to just have a loop that you can see all the way around. Not very realistic that way. So I'm going to use the tunnel and hill to create at least a minor illusion that the railroad doesn't just loop around. I'm using the leftover pieces of foam board to build the skeleton. On top of this I'll use plaster sheets, then the scenery. I picked up a set of tunnel portals at the recent train show down in Edison (more on that in a later post) so all the parts are ready. Just need to block off a few hours to dive in. 

Crossover for switching and passing, along with the industrial yard.

As this layout will be a fictionalized North Jersey, I'm going to try to cram in as much to represent the area as possible. And what would a New Jersey layout be without some industry. The southeast section will have the crossover that will allow trains to both pass on the siding, and switch into the industrial yard area. I'm not sure what I'm going to do here to hide the outer loop. But the middle of it will have a factory of some kind and the outer edge of the scenery will be made to look like something in the Meadowlands. 

All the wiring is fed through the benchwork. The initial incarnation of this layout will be DC, but I'm also adding some things like dead feeder connections throughout so a transition to DCC later will be possible. Speaking of wiring... 

Kato No. 4 switches. Lots of them. But..!

All this progress wouldn't be possible without one of the best eBay finds yet. This lot of six Kato No. 4 switches for less than $100 has allowed me to really shrink the space needed to get some interesting track configurations, something the standard No. 6 switches did not. The problem with No. 4 switches is you have to file a groove into the rails so the points can push in further and be much more flush with the rail. This was a very simple process and the switches are nearly flawless. Even the Atlas 4-4-0s ran over them dozens of times with only one or two derailments. I used Mike Fifer's excellent how-to video. Go subscribe to his youtube channel if you haven't already. 

Thursday, August 26, 2021

Starting a Shelf Layout

I'm building a new layout. This time it's a shelf-style, utilizing the existing shelf in the boys' playroom. This was the original plan years ago, but I was holding off on it since we expected to move at some point over the last 12 months. That didn't happen, and doesn't look like it's going to anytime soon with the market being insane. So I went to the store, picked up some wood, and started cutting. 


The only guide I was using was a pencil sketch I made with some dimensions. You'll see in a sec the shape of the layout on the shelf. But the idea here was to create something that I could easily take apart and move if necessary. So I created a pseudo-module standard for myself. The two ends would be L-shaped to accommodate the loops, with 2x1 sections added between. I'm going use bolts to connect all of them, again for an easy way to take it down and reassemble. 

I used simple pine board for the frame, and 1/4-inch plywood for the surface. It's extremely lightweight, something I'm happy about. I also picked up the "model trains" foam board that I should have used last time. This is all an exercise in "what I should have done last time." 


The two L's are in place, with the 2x1 section in the middle. If we want to expand--the shelf this is on extends to the right about 10 more feet--it's as simple as creating more 2x1 sections and plugging them into the layout. The track is not a final arrangement. This was a quick "let's see what we can do with all the track we have" and it worked out nicely to get some trains running right away and the boys happy.

I have to adjust and buy more track to make the loops fit better and just improve this overall. And of course we also have to put down the foam board. But I can say with confidence this is a vastly improved layout design, with longer runs and much easier access to all the areas. It wasn't easy reaching three feet across the old layout when a train stalled. 

This is the very early stage, so stay tuned as we progress! 

Thursday, November 5, 2020

Testing Unitrack, First New Track in 25 Years

Got to keep this on the DL. I don't want the 5-year-old to find out ;). But I bought him a Kato Unitrack pack for Christmas. It's tough for him to run trains on the layout, since he has to be so careful and the track is pretty spotty. I've heard only good things about Unitrack, especially how easy it is for younger children to get trains up and running with it. MSRP on the Master 2 pack is $210, but I found a NIB set for less than $170 including shipping on eBay. 

Since I haven't purchased any new track in about 25 years, my curiosity got the best of me. I had to try it out. There's also the fear that something may have gotten damaged in transit. I didn't set up the whole thing. Just did a visual once-over of the contents. But I did get the feeder track, one straight section, and the power pack set up. My first test was with the Penn Central E9. It ran smoother than I can ever remember. Of course, I ran downstairs to get one of the Atlas 4-4-0's to really see how much difference this track would make. Well, you can see for yourself... 

Friday, March 15, 2019

Catching up with rolling stock, layout and more

Much of what you read in this post is a condensed version of what I posted over on Trainboard.com. I've decided to move things over here from there, since I'm less in the discussion phase and more in the narrative phase of the project.

June 2018

Dropped $70 on an Atlas PRR 1610 from eBay. Not sure how I managed to find that one, but it's a steal and I'm super happy about it. I also ordered an Atlas Gen. Haupt from Streamlined Backshop with a DCC install that looks great. One hangup on that one, though... I don't have a DCC layout. But figured I'd get it installed now. I just can't really use it on the layout. The final item in this batch is a set of four Bachmann W&ARR boxcars. The boys were naturally excited about those since they're "from the movie."


The Arnold Coaches episode was a short one, but a learning experience. In need of passenger cars, I saw a set of old W&ARR coaches on eBay. I got them for something like $75. It felt like a bit much, but it was early in my education about all this and I was getting anxious. After some testing, I figured out why they weren't worth the time, effort, or money. 

From the time: 
There was a bit of trouble, I think due to the plastic wheels. But I haven’t investigated thoroughly yet. They don’t spin as freely as I’d like. Would love to replace them with new ones. But they are attached using pins that are molded into the bed, not the normal kingpins I’m used to. Hmm... 
Otherwise they’re in great condition. Almost no visible wear. And they’re *heavy*, which I was a little worried about. But both the Bachmann’s pulled all three with only minor slipping. 

Fast forward a few days... 
I'm returning the Arnold passenger cars. Too much work to retrofit them. Will look into Bachmann or another maker for passenger cars. There are many on eBay. 

Mid-month, I ran out of money, so I started messing around with layout software for what I imagined to be my "dream layout":
Work on the actual locomotives has been slow, as I only have about an hour at night available.
I cleaned up the wheels of the Gen. Haupt, and its pickup is already improved. But I think much of the pickup issues has to do with the track being 20+ yrs old. Some of the track is actually 30-40 yrs old. Still, considering, I've had only one or two stalls during a complete runaround of the 3'x3' layout I'm using right now. I also didn't solder anything or take any of the care I'm supposed to while laying track. I used fine sandpaper on top of the rails and cleaned them with alcohol, which cleared up 80% of the issues. I'm going to add more weight to them in the cabs and front of the tenders. I'll need to cover up the decoder anyway, so it should work out nicely.   
In the meantime, I got antsy and way ahead of myself, so I did a draft layout for the room I'm going to use. It'll be a shelf layout and the room structure already accommodates that. You'll see when I get photos posted. But for now, here's what will eventually become a Civil War single-track railroad, loosely based on the W&ARR. I plan to use Peco C55, which I know is a little expensive, but I want to be able to run my old pizza cutters on it, too. Plus, I read the switches are better. I'm going to build this in DCC, so I'll also need the auto-reversers for the reverse loops. All of this is months, if not a year away, so I don't expect to update anything about the layout for a good long while. 
Yeah, it'll be more than a year away. No chance that I'll get something like that done by this June.

Finally got smart and tracked down some Micro-Trains Civil War era cars. Added five more freight cars. Found them cheap. To be honest, I was shocked to find them at all. But one thing I still can’t seem to find more of is the regular boxcar. The converted house cars will do just fine for now.  

I also wanted to see how well the Atlas engines pulled. 

So I coupled up an 11-car train, which included the four heavier Bachmann W&ARR boxcars. And aside from a little hesitation for a moment, the two Atlas had no problems.

Here's the PRR No. 1510 pulling 11 freight cars. I blame the moment of hesitation on bad track/pickup. This engine was running on pulse setting using a Throttlepack 501 N, but I hope the Tech 7 I ordered will help with the slow speed control. The U.S.M.R.R. Gen. Haupt (which has a decoder installed, the PRR doesn't) doesn't react to the pulse setting at all, which is bothersome since the Atlas engines on the full setting start moving at about 40 mph. Not realistic at all. The Bachmann engines, surprisingly, have much better slow speed reaction with the 501. Not sure if that's a motor thing. 


I got an order of MTL wood frame trucks and the simulated link-and-pin couplers. The plan was to convert all the Bachmann CWE cars, with enough leftover trucks/couplers in case I ever need more. 

I recall seeing the trucks and couplers advertised as being compatible with the Bachmann cars, but maybe I misread it. When I tried to simply swap out the trucks, they didn't fit over the existing frame. 

Instead of drilling out the MTL trucks--which would thin them out and harm the structural integrity--I took a hand file to shave down the screw holes on one of my old cars as a test. I went all the way down to the base, but as you can see in the second photo, it still wasn't enough! The car still rides high compared to the stock Bachmann car and the MTL car. 

Before I proceed with a dremel tool to get these down to the right height, let me ask: Is there another way? Or is this normal kind of stuff when adapting stock items to my needs?  
The first pic is of the old Bachmann frame that I filed (top) and the stock/new Bachmann frame (bottom) to compare. 

July 2018

So I guess by the end of June it was too much to just keep running trains on the wood table. I needed something more. Here's the update with a few photos. It was *really* hot out during the days I was building this thing. I had to do it outside because the boys wanted to be outside in the sprinkler and pool. 
Couple updates. While I’m not nearly ready to build the big one, I’ve been antsy to get something done that can run trains. So I got some foam boards, plaster cloth, cork, and a small wood kit depot the other day, and started a 3x3 layout. Nothing specific. Rural overall and generic era so we can run both the 19th and 20th century trains. 
Please don’t have too much fun at my expense. I’m aware of all the mistakes I made. The gap between rails in the last two pics is pretty glaring. 
But even with the poor pickup on those engines, the gaps didn’t cause a problem. I cleaned up all the old track—30-yr old code 80–and bought new rail joiners. It’s surprisingly solid. I actually forgot to take a wide pic of the whole thing as it stands now. Will do that later. I just need to start working on the landscaping and a few more buildings. The reason I went with the large rolls of cork is because I don’t want the track raised too high above the surrounding terrain. I want that “old track” look.  
   

Late-July 2018

Once my 3-year-old moved into the same room as the 7-year-old, it freed us to move out of the basement bedroom. 

That means we have a play/rec room down there now. 
Moved around some rooms in the house, meaning I finally have a room for the layout!  
So I got paint and scenery, and went to work. I’m further along than the final photo shows, but I’ll have another update soon. I tell ya, seeing the ground cover going down really boosts the morale. 
I also picked up a bunch of 1860 passenger cars and another engine for super cheap. 
They need some work, and I ordered all new trucks from shapeways. Getting them fitted with the new trucks and link and pin will look great.
 
The ballast didn’t turn out how I wanted. I’m going to make the rest of it look more like a dirt/ballast mix, as ballasting back then isn’t what we think of now. 


August 2018

Update and video time! 

The Atlas 4-4-0 P.R.R. 1610 pulling a load of 13 freight cars, a mix of U.S. Military R.R., Manassas Gap R.R., and Pennsylvania R.R. (latest editions! Should have a Georgia R.R. arriving today). The key to a smoother run is weight. I recently added about 1.5 oz of tungsten putty to places like the pilot truck, cab, and tender under the wood load. There's only one or two spots it hesitates, but that's probably because I didn't clean the track in over a week. The layout is progressing along nicely, albeit slowly. I'm only showing the parts of the layout that have (at least some) scenery, and all of it will be improving on a continuous basis. This accounts for about 3 months of work.


October 2018

Geez, time really got away from me. School and football started up and suddenly it’s October. Anyway, here’s a quick landscape update. One more corner done. A little grove and a bunch of ground cover. Need more trees though. Pines would be good. 


And I managed to get my hands on eight (!) of those undecorated MTL boxcars. I painted four so far w a rust color. Hand painting, not spraying. I figure the real things weren’t sprayed so this would work out. The first coat looks so good I may not do a second. Will need to order decals. 

Also, I’m debating what color to do the second set of four. I think the slate gray is generic enough for this period that it could work with almost any line.


The blue-gray color looks pretty nice on the boxcars. Adds some needed variety to the roster. The rust color on the other boxcars almost looks like the iron boxcars used by the B&O during this era. Now I just need to find some stock cars or other kind of ventilated boxcars. I haven't ordered decals yet, so they remain plain. I forgot to paint and install the brake wheels to each of the new boxcars. Have to get around to that, too. 


But the biggest news on the scenery front is that I finally got around to the water. It was scary going in, since I've never done anything like this before. But now I'm really happy with how it turned out. Used rocks from the back yard to make the banks and shore line. Once I finally break down and buy some dam trees (they really add up $$) the whole center of the layout will be pretty impressive. 

Now the story continues on the main feed of this blog. Thanks for reading...