Here's a look at the Bachmann cars. The tan color looks good. The old numbers in the middle still show through. I should have scratched them off before I started painting. That's a bad mistake and I'm kicking myself for not catching it.

Turns out I'm not going to use a dark color for the trim work. The decals from Microscale only have the passenger lettering "United States Military Rail Roads" in dark/black, not the white or gold they mention in the paperwork.

That's a pretty big disappointment, since every photo I've seen from the war shows light lettering on dark backgrounds. But I don't have much of a choice here. I'll have to paint the top border in the light tan, and use the dark brown for just the trim work around the car. (Update: You can see the finished USMRR passenger car here.)
To The Libraries
As you'd expect, much of the U.S.M.R.R.'s operations during the Civil War focused on the movement of freight to the armies in the field. When the army itself needed to move its men, they walked. Transporting men by rail was almost completely out of the question—almost. We know this wasn't always forbidden, as the simple existence of photos showing passenger coaches in operation on military roads proves it.
 |
| Looking northeast |
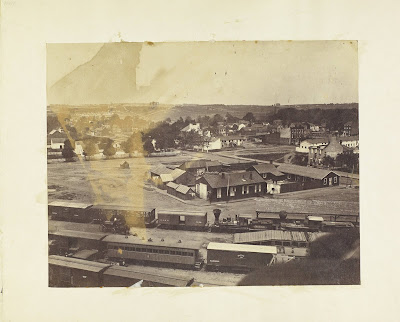 |
| Looking northwest |
Passenger Coaches
In the two photos here, there are five passenger coaches, all lettered for the U.S.M.R.R. I can't exactly make out what is in the center of the cars, but it appears to be a number within a shield or something. There's another photo (third photo in this post) by Andrew J. Russell of a train wreck cleanup crew that shows a U.S.M.R.R. 10-window passenger coach with a number in the center of its side, but not within a background shape like the ones here.
The coaches in the two Alexandria yard photos all have at least 12 windows. The coach marked "Hospital Car" in the first photo has 15 windows.
 All four cars in the photo looking to the northeast also appear to be painted different colors. The sunlight is reflected noticeably different on each one. Even if they're all the same color, maybe they're different shades. The only description I've seen, over at the USMRR Aquia Line, indicates brown/tan color schemes when these cars were painted by the U.S.M.R.R. But as was the case with boxcars, I'm sure there was a mix of colors depending on the original owners of these passenger cars.
There's so much more to analyze, like the "Hospital Car" boxcar, and rear/tender lamp on the bottom left engine in the northwestern photo. In fact, all the engines in these photos look like they have been modified for yard-only use. Could be interesting to someday add these features to my layout, especially once I build a yard. That's probably for the next layout.
Full view of the Alexandria Yard
As I was finishing up this entry, I realized it would be great to get a view of the whole Alexandria Yard by combining the two photos as best I could. Take a look below.

Teleporting Boxcar?
On the surface, it appears Russell made the northeastern photo, then simply turned the camera to make the northwestern view. But look closely at the leftmost boxcar in the northeastern photo: #1307.
You can see it has been lettered and numbered in a sans serif font; the numbers look hand painted and not stenciled. The brake wheel is above the roofline, with a plank down the middle.


