Showing posts with label ebay. Show all posts

Thursday, December 2, 2021

Shelf layout progress: Tunnel hill, final track configuration, No. 4 switches

Slow and steady goes the shelf layout. The foam board is now on. Track is set with one portion glued down. And I'm starting to build up the one section where a tunnel will go through a hill. Using Kato Unitrack has been a revelation, even if I'm probably not utilizing it to its fullest potential by mapping out the exact pieces ahead of time. This has been a trial-and-error endeavor, which has taught me a bunch about using space and other things I can't get without just doing it. 

The future tunnel hill. 

The Tunnel Hill section is something I was debating as an option for the northwestern portion of the layout, as I didn't want to just have a loop that you can see all the way around. Not very realistic that way. So I'm going to use the tunnel and hill to create at least a minor illusion that the railroad doesn't just loop around. I'm using the leftover pieces of foam board to build the skeleton. On top of this I'll use plaster sheets, then the scenery. I picked up a set of tunnel portals at the recent train show down in Edison (more on that in a later post) so all the parts are ready. Just need to block off a few hours to dive in. 

Crossover for switching and passing, along with the industrial yard.

As this layout will be a fictionalized North Jersey, I'm going to try to cram in as much to represent the area as possible. And what would a New Jersey layout be without some industry. The southeast section will have the crossover that will allow trains to both pass on the siding, and switch into the industrial yard area. I'm not sure what I'm going to do here to hide the outer loop. But the middle of it will have a factory of some kind and the outer edge of the scenery will be made to look like something in the Meadowlands. 

All the wiring is fed through the benchwork. The initial incarnation of this layout will be DC, but I'm also adding some things like dead feeder connections throughout so a transition to DCC later will be possible. Speaking of wiring... 

Kato No. 4 switches. Lots of them. But..!

All this progress wouldn't be possible without one of the best eBay finds yet. This lot of six Kato No. 4 switches for less than $100 has allowed me to really shrink the space needed to get some interesting track configurations, something the standard No. 6 switches did not. The problem with No. 4 switches is you have to file a groove into the rails so the points can push in further and be much more flush with the rail. This was a very simple process and the switches are nearly flawless. Even the Atlas 4-4-0s ran over them dozens of times with only one or two derailments. I used Mike Fifer's excellent how-to video. Go subscribe to his youtube channel if you haven't already. 

Friday, May 21, 2021

My own 'Transition Era' with new diesels and cars

 It's been a long few months since tearing up the old 2018 layout--yes, I went through with it. Part of the reasoning was that we got new Unitrack for our 6-year-old and new trains to go with it, and needed the table. So in the interest of catching up on half a year's worth of stuff, I'll start with the new purchases. 

For Christmas we got the 6-year-old this fine Atlas Susquehanna #4004 Dash 8-40B, along with a bunch of freight cars, to go with his new Unitrack. 


Here's a quick video run-by I finally got around to uploading. It runs very nicely, especially for a used engine.  Then again, I'm not used to running diesels, or any locomotives that have so many points of contact on the track. It's so nice to not worry about choppy power supply to the motor. 


The other new engine that we got was for the 6-year-old's birthday this spring. He's been wanting a passenger locomotive for a while, since we have the 25-year-old Amtrak double-deckers. The old Amtrak EMD F40PH was beyond repair--at least for me and time--so I got him a new one from KATO. It's easily the best engine I've ever run. We took it outside in March on a warm sunny day. 


That's about it for the modern additions to our collection. I also found a big, cheap lot of freight cars for the Susquehanna engine, and added another switch and more track to the tabletop layout. 

The next update will be back to Civil War era trains, as I've worked on some new cars, figures, and buildings. Stay tuned. Hopefully it won't be another five months until then. 

Thursday, November 5, 2020

Testing Unitrack, First New Track in 25 Years

Got to keep this on the DL. I don't want the 5-year-old to find out ;). But I bought him a Kato Unitrack pack for Christmas. It's tough for him to run trains on the layout, since he has to be so careful and the track is pretty spotty. I've heard only good things about Unitrack, especially how easy it is for younger children to get trains up and running with it. MSRP on the Master 2 pack is $210, but I found a NIB set for less than $170 including shipping on eBay. 

Since I haven't purchased any new track in about 25 years, my curiosity got the best of me. I had to try it out. There's also the fear that something may have gotten damaged in transit. I didn't set up the whole thing. Just did a visual once-over of the contents. But I did get the feeder track, one straight section, and the power pack set up. My first test was with the Penn Central E9. It ran smoother than I can ever remember. Of course, I ran downstairs to get one of the Atlas 4-4-0's to really see how much difference this track would make. Well, you can see for yourself... 

Monday, August 31, 2020

New engine and the repainted Clarke, plus some buildings

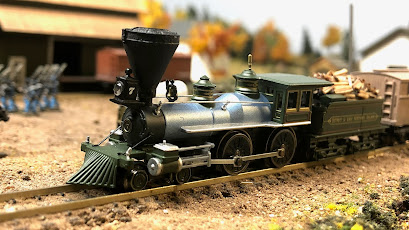
It's a big deal whenever a new engine joins the roster, so this post is a big deal. There are usually about three to five Civil War era Atlas 4-4-0's on eBay at any given time, but they're almost always overpriced, at least for my wallet. So when a locomotive is available and in my range, I have to pounce. 

Atlas-4-4-0-Lima
Newest addition to the roster:
Atlas 4-4-0 #7 of the Detroit & Lima Northern. 

That's what led to the No. 7 being purchased. It's got a great Russia iron boiler jacket, and has minimal ornamentation. The latter is perfect for when I can repaint it. I don't have any engines with mostly blue livery yet. The No. 7 should look great. I picked up some new paints recently and the color scheme was definitely incorporated in that. 

One of the B&O twins is now the USMRR Clarke.

Speaking of paint, after a horrible misstep (more on that later), I was finally able to paint and decal one of the B&O twins and make it the USMRR Clarke. I'll have to figure out a better solution for covering the number plate on the boiler, and the drivers will need some paint work. But overall I'm very happy with this one. 

This was also one of the engines I wanted to experiment with Bullfrog Snot. You saw the video of the Scout pulling 27 cars after getting the treatment. Here's a pic of the Clarke under the knife a few weeks back. It's a very easy process, but tough to truly master right away. Practice makes perfect.  

New kicks.

But before all this, there was a disaster. I had rubbed off as much of the old lettering as I could, painted the tender and old name plate under the cab window, and added new decals that very closely match the original Clarke. Then came the clear coat of spray. UGH! I was too heavy on the first coat. The decals degraded and smudged. All that work, about four hours, down the drain. Some people I talked to online said it could have been the decals. They were an old sheet, so it's possible. 

The moment I was ready to scream.

Now for the buildings. It's easy to get too heavy with the non-dwelling structures, so I tracked down some houses that fit the era. You wouldn't believe the amount of time I spent debating what color to paint this first house. Most wood houses were white because that's what was cheap. But I needed something else, so a nice yellow with dark green trim was the choice. The roof was simple black paper, weathered with some diluted white paint. It may not be completely accurate for the period, but I don't anticipate many stitch-counters visiting my layout anytime soon. The second house is a simple white farmhouse, similar to what you'll see across many battlefields. I might add a stone faux-foundation to it using a stone pattern printed on paper and wrapping it around the pylons. 


Typical house that could serve nicely in the Civil War era.

The last building is sort of a kit-bash, even though I didn't actually bash two together. Ok so it's more like just a modification of a kit. Anyway... this was my first experiment with covering a building with paper to give a non-wood exterior. This one was brick. It's the same Micro-Trains co-op kit that was painted green and you can see in the background of all these photos. I covered a few of the windows, and did not add the loading dock or subroof. I did move the loading dock bay door down to ground level, which was very easy since the original door opening is now covered by the brick paper. Looks pretty good, but I can't put it on the layout as it stands right now. It's too noticeably-similar to the green building. But it'll fit nicely when I can build the bigger shelf layout with several "towns" or whatever they'll be. 

Sort of a kit-bash. Changed up some of the doors and windows,
and added a brick exterior to the Micro-Trains co-op. 

Since I'm not building that shelf layout for at least another 18 months, I'll keep working on the current layout to hone my amateur skills. Here's an overhead shot of the area I plan to work on. The wagons and escort are where I plan to build a road, bordered by either fences or stone walls. The 32-pounders are just too great to leave off the layout. Even if they don't exactly fit what I'm portraying here--What exactly am I portraying here anyway? I have no idea!--I'll need to construct some kind of earthen fortifications straddling the road. If I put the guns emplacements a few inches more to the left in this photo, that should look a little better than them being right on the little farmstead. Plus, if I can get a "fort" scene going on, that'll open up a ton of new possibilities for scratch building, like chevaux de frise, which I've been itching to build. 

Needs... more stuff.


I'll have a new update sometime in the next few weeks. Stay tuned.

Tuesday, May 7, 2019

DCC++ and an eBay score


eBay score


Finding N scale Civil War engines and rolling stock is difficult enough. Finding structures, especially the Micro-Trains Line laser kits, are downright impossible. Well, that's what I thought. Out of the blue I saw several Civil War era pieces for sale on eBay, including the MTL Civil War Era Loco Shed and, an awesome bonus, two packs of Sibley Tents!

Other items for sale that day were what looked to be 3D printed passenger cars, but I wasn't going to spend that kind of money to win those at the moment. What I definitely was going to do: win the shed and tents. They arrived and I couldn't be happier. I'm about 1/3 of the way through the shed, and I punched the tents and firewood out of the frames. I'll post an update on this when I'm done. Frankly, I don't know where I will fit the engine shed, as I didn't set up any kind of siding or yard to accommodate it. The Sibley Tents should fit nicely almost anywhere.


DCC++


About three months ago, I read about DCC++ and it piqued my interest. For about $50 I could make my own DCC system? Yes, please. I've been itching to get familiar with DCC so that in a few months, I can start actually building a new layout with DCC from the start. This would be an awesome way to get the ball rolling.

So I got to work on ordering supplies and carving out some time to work on it. The two best tutorials I found were by DIY & Digital Railroad and Cobo in HO.

After some false starts, I got the thing to power the Gen. Haupt. But the program track was makeshift and poorly connected. So I got to work building a nice program track that would offer stability and connectivity.

I used a piece of composite wood, some code 80 Atlas flex track, and two siding bumpers. But what I was really anxious about was soldering for the first time. Yes, I've never soldered before.

Fast forward about an hour. The tracks are cut to size, cleaned, and fitted with new rail joiners.

Things worked out well, even if the soldering job wasn't very aesthetic. I cleaned it up a little with a file after it was done. The wires ran through the board. The track caulked down tight. And the locomotives wouldn't run off the end of the earth. Testing out the DCC++ system was made much better using this later that day.


I get the engine running, but can't seem to read or do anything to the decoder. For three days, I'm trying to figure out what I'm doing wrong. It has to be something, right? The engine runs ok, even if a little rough. But JMRI keeps giving me an error message: "No acknowledge from locomotive (308)"

Turns out the answer was right in front of me the whole time... the wires! I had them in the main and not the program. How stupid of me. Once I did that, restarted the locomotive entry in DecoderPro and hit the read button, holy moly it worked.

But there's another problem. The Haupt is running very poorly, considering how wonderful everyone says DCC can be for slow speeds. It starts out running at what appears to be in the 15mph zone, and when it does run, it has a  bad lurching gait to it. I'm hopeful that it's just a matter of adjusting the settings in the decoder, and not a bad engine.


Update: After consulting with decoder guru Steve Fields, I've made some adjustments to the CVs and, well, just look at how beautifully it runs!


Friday, March 15, 2019

Catching up with rolling stock, layout and more

Much of what you read in this post is a condensed version of what I posted over on Trainboard.com. I've decided to move things over here from there, since I'm less in the discussion phase and more in the narrative phase of the project.

June 2018

Dropped $70 on an Atlas PRR 1610 from eBay. Not sure how I managed to find that one, but it's a steal and I'm super happy about it. I also ordered an Atlas Gen. Haupt from Streamlined Backshop with a DCC install that looks great. One hangup on that one, though... I don't have a DCC layout. But figured I'd get it installed now. I just can't really use it on the layout. The final item in this batch is a set of four Bachmann W&ARR boxcars. The boys were naturally excited about those since they're "from the movie."


The Arnold Coaches episode was a short one, but a learning experience. In need of passenger cars, I saw a set of old W&ARR coaches on eBay. I got them for something like $75. It felt like a bit much, but it was early in my education about all this and I was getting anxious. After some testing, I figured out why they weren't worth the time, effort, or money. 

From the time: 
There was a bit of trouble, I think due to the plastic wheels. But I haven’t investigated thoroughly yet. They don’t spin as freely as I’d like. Would love to replace them with new ones. But they are attached using pins that are molded into the bed, not the normal kingpins I’m used to. Hmm... 
Otherwise they’re in great condition. Almost no visible wear. And they’re *heavy*, which I was a little worried about. But both the Bachmann’s pulled all three with only minor slipping. 

Fast forward a few days... 
I'm returning the Arnold passenger cars. Too much work to retrofit them. Will look into Bachmann or another maker for passenger cars. There are many on eBay. 

Mid-month, I ran out of money, so I started messing around with layout software for what I imagined to be my "dream layout":
Work on the actual locomotives has been slow, as I only have about an hour at night available.
I cleaned up the wheels of the Gen. Haupt, and its pickup is already improved. But I think much of the pickup issues has to do with the track being 20+ yrs old. Some of the track is actually 30-40 yrs old. Still, considering, I've had only one or two stalls during a complete runaround of the 3'x3' layout I'm using right now. I also didn't solder anything or take any of the care I'm supposed to while laying track. I used fine sandpaper on top of the rails and cleaned them with alcohol, which cleared up 80% of the issues. I'm going to add more weight to them in the cabs and front of the tenders. I'll need to cover up the decoder anyway, so it should work out nicely.   
In the meantime, I got antsy and way ahead of myself, so I did a draft layout for the room I'm going to use. It'll be a shelf layout and the room structure already accommodates that. You'll see when I get photos posted. But for now, here's what will eventually become a Civil War single-track railroad, loosely based on the W&ARR. I plan to use Peco C55, which I know is a little expensive, but I want to be able to run my old pizza cutters on it, too. Plus, I read the switches are better. I'm going to build this in DCC, so I'll also need the auto-reversers for the reverse loops. All of this is months, if not a year away, so I don't expect to update anything about the layout for a good long while. 
Yeah, it'll be more than a year away. No chance that I'll get something like that done by this June.

Finally got smart and tracked down some Micro-Trains Civil War era cars. Added five more freight cars. Found them cheap. To be honest, I was shocked to find them at all. But one thing I still can’t seem to find more of is the regular boxcar. The converted house cars will do just fine for now.  

I also wanted to see how well the Atlas engines pulled. 

So I coupled up an 11-car train, which included the four heavier Bachmann W&ARR boxcars. And aside from a little hesitation for a moment, the two Atlas had no problems.

Here's the PRR No. 1510 pulling 11 freight cars. I blame the moment of hesitation on bad track/pickup. This engine was running on pulse setting using a Throttlepack 501 N, but I hope the Tech 7 I ordered will help with the slow speed control. The U.S.M.R.R. Gen. Haupt (which has a decoder installed, the PRR doesn't) doesn't react to the pulse setting at all, which is bothersome since the Atlas engines on the full setting start moving at about 40 mph. Not realistic at all. The Bachmann engines, surprisingly, have much better slow speed reaction with the 501. Not sure if that's a motor thing. 


I got an order of MTL wood frame trucks and the simulated link-and-pin couplers. The plan was to convert all the Bachmann CWE cars, with enough leftover trucks/couplers in case I ever need more. 

I recall seeing the trucks and couplers advertised as being compatible with the Bachmann cars, but maybe I misread it. When I tried to simply swap out the trucks, they didn't fit over the existing frame. 

Instead of drilling out the MTL trucks--which would thin them out and harm the structural integrity--I took a hand file to shave down the screw holes on one of my old cars as a test. I went all the way down to the base, but as you can see in the second photo, it still wasn't enough! The car still rides high compared to the stock Bachmann car and the MTL car. 

Before I proceed with a dremel tool to get these down to the right height, let me ask: Is there another way? Or is this normal kind of stuff when adapting stock items to my needs?  
The first pic is of the old Bachmann frame that I filed (top) and the stock/new Bachmann frame (bottom) to compare. 

July 2018

So I guess by the end of June it was too much to just keep running trains on the wood table. I needed something more. Here's the update with a few photos. It was *really* hot out during the days I was building this thing. I had to do it outside because the boys wanted to be outside in the sprinkler and pool. 
Couple updates. While I’m not nearly ready to build the big one, I’ve been antsy to get something done that can run trains. So I got some foam boards, plaster cloth, cork, and a small wood kit depot the other day, and started a 3x3 layout. Nothing specific. Rural overall and generic era so we can run both the 19th and 20th century trains. 
Please don’t have too much fun at my expense. I’m aware of all the mistakes I made. The gap between rails in the last two pics is pretty glaring. 
But even with the poor pickup on those engines, the gaps didn’t cause a problem. I cleaned up all the old track—30-yr old code 80–and bought new rail joiners. It’s surprisingly solid. I actually forgot to take a wide pic of the whole thing as it stands now. Will do that later. I just need to start working on the landscaping and a few more buildings. The reason I went with the large rolls of cork is because I don’t want the track raised too high above the surrounding terrain. I want that “old track” look.  
   

Late-July 2018

Once my 3-year-old moved into the same room as the 7-year-old, it freed us to move out of the basement bedroom. 

That means we have a play/rec room down there now. 
Moved around some rooms in the house, meaning I finally have a room for the layout!  
So I got paint and scenery, and went to work. I’m further along than the final photo shows, but I’ll have another update soon. I tell ya, seeing the ground cover going down really boosts the morale. 
I also picked up a bunch of 1860 passenger cars and another engine for super cheap. 
They need some work, and I ordered all new trucks from shapeways. Getting them fitted with the new trucks and link and pin will look great.
 
The ballast didn’t turn out how I wanted. I’m going to make the rest of it look more like a dirt/ballast mix, as ballasting back then isn’t what we think of now. 


August 2018

Update and video time! 

The Atlas 4-4-0 P.R.R. 1610 pulling a load of 13 freight cars, a mix of U.S. Military R.R., Manassas Gap R.R., and Pennsylvania R.R. (latest editions! Should have a Georgia R.R. arriving today). The key to a smoother run is weight. I recently added about 1.5 oz of tungsten putty to places like the pilot truck, cab, and tender under the wood load. There's only one or two spots it hesitates, but that's probably because I didn't clean the track in over a week. The layout is progressing along nicely, albeit slowly. I'm only showing the parts of the layout that have (at least some) scenery, and all of it will be improving on a continuous basis. This accounts for about 3 months of work.


October 2018

Geez, time really got away from me. School and football started up and suddenly it’s October. Anyway, here’s a quick landscape update. One more corner done. A little grove and a bunch of ground cover. Need more trees though. Pines would be good. 


And I managed to get my hands on eight (!) of those undecorated MTL boxcars. I painted four so far w a rust color. Hand painting, not spraying. I figure the real things weren’t sprayed so this would work out. The first coat looks so good I may not do a second. Will need to order decals. 

Also, I’m debating what color to do the second set of four. I think the slate gray is generic enough for this period that it could work with almost any line.


The blue-gray color looks pretty nice on the boxcars. Adds some needed variety to the roster. The rust color on the other boxcars almost looks like the iron boxcars used by the B&O during this era. Now I just need to find some stock cars or other kind of ventilated boxcars. I haven't ordered decals yet, so they remain plain. I forgot to paint and install the brake wheels to each of the new boxcars. Have to get around to that, too. 


But the biggest news on the scenery front is that I finally got around to the water. It was scary going in, since I've never done anything like this before. But now I'm really happy with how it turned out. Used rocks from the back yard to make the banks and shore line. Once I finally break down and buy some dam trees (they really add up $$) the whole center of the layout will be pretty impressive. 

Now the story continues on the main feed of this blog. Thanks for reading...

Wednesday, June 13, 2018

The beginning... sort of

TL;DR version: 

After a ~20-year hiatus from model trains, I'm getting back into it, thanks to my two sons--6 and 3 years old. I've seen one or two fellas on here say they're modeling the Civil War era. Just wanted to throw my hat in and say that I'm planning on starting down that path. I'll try to post some photos as I go along, but this will essentially be my personal progress thread. Warning: It'll be a slow one, as I work two jobs, have two young children, and limited funds for anything but a slow and steady path forward.

The backstory: 

I inherited a large box of old n-scale stuff from my uncle in the mid-90s, which is where I first starting using n-scale. And since that stuff was old back then, it's reeeally old now. The oldest is an Arnold 0-6-0 Wabash switcher from 1966, and the second oldest is a Bachmann F9 PennCentral from 1971. Over the years I added some new track, engines and cars, but not a whole lot since I was given so much to start with. Plus we never had much extra money. My dad built me a nice train table that could fit either the 027 set I had, or a larger n-scale layout. It was great.

Since I started loving trains around 2 years old, I had always wanted an American 4-4-0 like "The General." The Great Locomotive Chase was (and probably still is) my all-time favorite movie. I grew up and live near Paterson, NJ, which many of you already know about in terms of locomotive history. It was very cool when I found out that both the General and the Texas were built in Paterson (though by different companies).

For Christmas one year my parents got me the Bachmann 4-4-0 Old Timer set. I was in heaven. But as many of you know, there was extremely limited Civil War era stuff available in n-scale, so I was limited in how much I could really do. And again, money was always an issue.

Skip 20 years, to today:

As most boys tend to be, my sons love trains. And now that they're old enough, I built a small 3x3 train table and cleaned up the n's as best I could to get them running again. Most of the stuff we have is of the diesel era, except for the Arnold switcher and the Bachmann 4-4-0 set. My boys also love The Great Locomotive Chase, so I decided to start looking for some new engines of that era.

Back in 2015, my older son got an Atlas catalog when we saw Santa at the Maywood Train Station. Atlas had been promoting their HO Erie Lackawanna series, and that station has a static S2 and caboose. But in that catalog was the Atlas Civil War era 4-4-0's. I didn't realize at the time it was a limited run, but my son loved looking at them in the book. And now recently that we've pulled out the n's, he went back and looked at that catalog reminding me that he loved the U.S. Military R.R. engine. I told him we'd save up for it.

About a month ago, I ordered a Bachmann F7 Erie-Lackawanna, the first new model train I've purchased since the 90s. It was like new, but a Plus, so its gears were cracked and I didn't realize it. Fortunately I didn't pay much. If I get around to replacing the gears, great, but if not, I have a nice Christmas tree ornament.

A few weeks ago, I found on eBay a set of two engines, the Jupiter and the No. 119 in their original white boxes with the manuals and all, for just $50, so I jumped on them, figuring at that price it'd be worth it no matter how they run. Turns out, they're great. A little hesitation here or there, but overall like new. They even successfully navigate the old turnouts and crossover nine times out of 10.

I haven't told my oldest yet, but I ordered the Gen. Haupt from Streamlined Backshop and it's currently getting a decoder installed for when we make the switch to DCC. I can't wait to show them. I also just bought 4 W&A R.R. boxcars from some train store for a really great price.

What's to come: 

My plan is to make the switch to DCC at least a year or two from now. DC works great for what we want, and the boys are happy. I'm going to build a shelf layout along two walls in our basement, and will need it to be transportable, as we plan to move in about 2 years. I'm debating whether or not to commit to the W&A RR, or somewhere else during the Civil War. We lived in Northern Virginia for a few years, so that's very tempting to do a U.S.M.R.R. layout or something along those lines.