Showing posts with label buildings. Show all posts

Thursday, August 18, 2022

Modern NJ layout: Curves fixed, factory built

 Once I made the switch to a modern-era layout set in New Jersey, I ran into the problem of curves being too tight for longer passenger cars like the NJ Transit coaches. After some unexpected construction and a few purchases of wider radius curved track, the issue is resolved as best as I could hope for. The only other option was to tear up most of the foam and completely rework the frame. That wasn't going to happen. So here we are. 

The track realignment was really stressful, having to add extensions to the "east" end of the layout and fill in the angle inside the squares. You can see the old curve inside the new. It's not a small correction. 

Old curve with new curve on top.

Track ripped up. 

Adding the new expansions consisted of cutting new frame pieces and some new plywood that hugged the planned curve. Took about a day to complete, using leftover foam chunks on top. The other addition here was to go with a double track mainline. I figured since I had the space now, why not allow space for a full freight or passenger train to bypass the other. Ultimately, I'd like to add separate power to the inside line and allow for independent operations within that, including the industrial area. 

After adding the new expansions and the first plaster cloth application.

I spoiled the building reveal with that photo, but it's actually the only one I took of the new section before more was added to the scenery. The double main line will be very nice and give much more depth to the layout and operations. 

Factory

Back in November, we picked up a Walthers George Roberts Printing Co. building set at the Edison train show. This spring I finally got started on it. It was surprisingly simple to construct and took about three days from start to finish. And that was only because I had to wait overnight for some of the big glue phases to dry before moving onto the next. 

Sprayed white, with dry-brushing brick. 

Since I wanted the brick to have the older look, I sprayed the base white as the mortar before using a dry-brush technique for the brick color on top. I had to be much heavier with the brick color than I thought. The concrete sections used a dark gray color. I debated whether to use a more tan/beige color, but the gray worked out just fine. I thought the red fire exit doors came out pretty cool in contrast to the rest of the building. 

Finished factory. 

Those trailers are about 40 years old, and too short compared to
modern 53-foot trailers. But they look cool. 

I've got a backlog of updates to post. Just have to write them out and get photos together. Expect another post next week that includes adding real roads and more scenery to the central and eastern portions of the layout. 

Tuesday, January 25, 2022

Modern-Era shelf layout: Big scenery update, trailer storage yard, ballast

 I'll have to finally come up with a better name than "tunnel hill" now that it's pretty much finished. Can't be confusing people since this is a blog titled Civil War Trains in N Scale. But it's done, with the interior of the tunnel painted and closed up from behind, and ballast along the track into the tunnel a bit. I realized after the fact that I should have added walls into the tunnel for at least the first few inches to simulate a tube. I can live with this. And again, this is all a learning experience for me. Small mistakes are fine. 


The open flat area below the tunnel will be residential lots. I'll need to build that later as I don't have enough or accurate houses right now. 


Tractor-trailer storage yard

The biggest addition this round is the landscaping and terrain, and the tractor-trailer storage yard. You can see a bunch of photos below. The first is the Susquehanna "SU-100" coming into the yard area from the "west," through the cut that separates the hill section from this new section. 

The "eastern" half of the new section features two rises in elevation to help add another break in the scenery before the approach to the downtown area and commuter station that'll come in the next few months. Here there are three tracks. The mainline to the station is in the middle. The passing/freight siding is on the bottom. And the reverse mainline is on the top and ducks behind the hill. 

Here's a look at the whole trailer yard. Once I get some actual trailers, it'll look good. There was an issue on my first attempt, however, as I used Woodland Scenics gravel for the lot surface. Those rocks were far too large. You can see some of them popping up from underneath the current surface. For this I used the WS fine ballast. It look almost perfect as a gravel lot surface. I plan to hit it with a little light paint to  give the effect of the truck paths. The chain-link fence adds to the little details that make a huge difference. 

I'll need to find houses that look better than the 40-year old Plasticville stuff. But you get the idea. 

A top-down look at the railroad cut on the western approach to the yard section. At first I wasn't sure how good this looked, but now I'm starting to come around. I really need to pain the wall blue or something. 

The next post will swing back to the original mission of this blog: The American Civil War. See you then. 

Monday, December 13, 2021

Edison, NJ train show, Nov. 2021

Took the boys to their first train show, the Greenberg Train Show on Nov. 28 in Edison, NJ. I hadn't been to one in many years, decades in fact. It was a real treat and we had a great time. The Edison expo center was huge, with an entire wing dedicated to the big layouts that you can see in the photos below. The Jersey Central N-Trak club was there with an "M" shaped modular layout. It also included a module of the USS New Jersey (BB-62), which was very cool and the 10-year-old in particular loved.

The main area of the show was full of stuff to buy, which was one of the main reasons I wanted to go, to pick up some "show priced" pieces.  As you might guess, a good 60% was O scale/Lionel, but about 10% was N scale, which was still a ton of inventory to look through. We came away with several modern era freight cars, a building that could pass for Civil War era, tunnel portals, and a modern era factory/industrial building. 

The trip was a success in all ways.

The huge N scale staging yard.

USS New Jersey (BB-62).

The boys admiring the N scale layout.

This was just one part of the layout area. 

Friday, October 30, 2020

Civilians and Colored Troops!

After some kind suggestions from the Civil War Railroads group, I ordered some 10 mm civilian figures from Thoroughbred Models. It's been a few weeks since then, and they're finally painted. I chose a mix of the poses and characters. While I was at it, I also painted some additional soldiers. There are some of the Good Ground Minis figures, for comparison. You can see the GHQ (soldiers, general officer, and Lincoln) and Thoroughbred (civilians() figures are very close, but the Good Ground (general officer and staff officer) figures to the far right are much larger and chunkier. 

Sampling of the newest figures, including civilians!

I realized my collection of figures wasn't historically accurate for scenes behind the front lines. What was missing? Black soldiers. They were used heavily for duties like supply and labor. I took some of the artillery crews, which looked like they were lifting something heavy, and made a few new soldiers. 

The soldier climbing the boxcar comes from the siege artillery crew set. It's one of my favorite little vignettes. The soldier sitting on the water tank is from a limbered field artillery set. He was originally riding a caisson. 


The civilians aren't exactly Civil War era, more like the 1880s. Particularly the women's skirts don't have the large hoops under them. But I'm not going to get that picky. You barely notice, anyway, because they're so small and the scenes are busy enough to distract from any historical inaccuracy of the fashion. 


Seeing all these figures at the station platform, however, leads me to think the building is too big for the 10mm figures from GHQ and Thoroughbred. I don't have the math done in my head, but the doors look at least a few "inches" too high. But I'm not going to change it out now. 

This is the kind of small accomplishment that offers big satisfaction. I'm planning on making a new video tour of the layout soon (I know, I know, I've been saying that for months) and having civilians in the station area will really add depth to the scene.

Friday, October 9, 2020

Not quite a tintype, but pretty close

U.S. Supply Depot, 1863

 I'm sure there are ways to get a modern digital photo to look like a tintype. Some day I'll get around to figuring it out. I took some photos the other day of just generic scenes. Two shots stood out when I added a basic iPhone filter to them. It came very close to the look of a Civil War era tintype. Seeing how they look, I'm going to experiment more with this. Modern digital color photos are great for sharing my layout with the model railroad world, but the Civil War historian in me is in love with recreating the tintype look.

Another view, with a short train stopped for water.

It's been tough to carve out time for the layout. I recently received some civilian figures from Thoroughbred Models that look close enough in size to match the GHQ figures. I'll make a post on those separately, including some other scenery and figures updates. 

Monday, August 31, 2020

New engine and the repainted Clarke, plus some buildings

It's a big deal whenever a new engine joins the roster, so this post is a big deal. There are usually about three to five Civil War era Atlas 4-4-0's on eBay at any given time, but they're almost always overpriced, at least for my wallet. So when a locomotive is available and in my range, I have to pounce. 

Atlas-4-4-0-Lima
Newest addition to the roster:
Atlas 4-4-0 #7 of the Detroit & Lima Northern. 

That's what led to the No. 7 being purchased. It's got a great Russia iron boiler jacket, and has minimal ornamentation. The latter is perfect for when I can repaint it. I don't have any engines with mostly blue livery yet. The No. 7 should look great. I picked up some new paints recently and the color scheme was definitely incorporated in that. 

One of the B&O twins is now the USMRR Clarke.

Speaking of paint, after a horrible misstep (more on that later), I was finally able to paint and decal one of the B&O twins and make it the USMRR Clarke. I'll have to figure out a better solution for covering the number plate on the boiler, and the drivers will need some paint work. But overall I'm very happy with this one. 

This was also one of the engines I wanted to experiment with Bullfrog Snot. You saw the video of the Scout pulling 27 cars after getting the treatment. Here's a pic of the Clarke under the knife a few weeks back. It's a very easy process, but tough to truly master right away. Practice makes perfect.  

New kicks.

But before all this, there was a disaster. I had rubbed off as much of the old lettering as I could, painted the tender and old name plate under the cab window, and added new decals that very closely match the original Clarke. Then came the clear coat of spray. UGH! I was too heavy on the first coat. The decals degraded and smudged. All that work, about four hours, down the drain. Some people I talked to online said it could have been the decals. They were an old sheet, so it's possible. 

The moment I was ready to scream.

Now for the buildings. It's easy to get too heavy with the non-dwelling structures, so I tracked down some houses that fit the era. You wouldn't believe the amount of time I spent debating what color to paint this first house. Most wood houses were white because that's what was cheap. But I needed something else, so a nice yellow with dark green trim was the choice. The roof was simple black paper, weathered with some diluted white paint. It may not be completely accurate for the period, but I don't anticipate many stitch-counters visiting my layout anytime soon. The second house is a simple white farmhouse, similar to what you'll see across many battlefields. I might add a stone faux-foundation to it using a stone pattern printed on paper and wrapping it around the pylons. 


Typical house that could serve nicely in the Civil War era.

The last building is sort of a kit-bash, even though I didn't actually bash two together. Ok so it's more like just a modification of a kit. Anyway... this was my first experiment with covering a building with paper to give a non-wood exterior. This one was brick. It's the same Micro-Trains co-op kit that was painted green and you can see in the background of all these photos. I covered a few of the windows, and did not add the loading dock or subroof. I did move the loading dock bay door down to ground level, which was very easy since the original door opening is now covered by the brick paper. Looks pretty good, but I can't put it on the layout as it stands right now. It's too noticeably-similar to the green building. But it'll fit nicely when I can build the bigger shelf layout with several "towns" or whatever they'll be. 

Sort of a kit-bash. Changed up some of the doors and windows,
and added a brick exterior to the Micro-Trains co-op. 

Since I'm not building that shelf layout for at least another 18 months, I'll keep working on the current layout to hone my amateur skills. Here's an overhead shot of the area I plan to work on. The wagons and escort are where I plan to build a road, bordered by either fences or stone walls. The 32-pounders are just too great to leave off the layout. Even if they don't exactly fit what I'm portraying here--What exactly am I portraying here anyway? I have no idea!--I'll need to construct some kind of earthen fortifications straddling the road. If I put the guns emplacements a few inches more to the left in this photo, that should look a little better than them being right on the little farmstead. Plus, if I can get a "fort" scene going on, that'll open up a ton of new possibilities for scratch building, like chevaux de frise, which I've been itching to build. 

Needs... more stuff.


I'll have a new update sometime in the next few weeks. Stay tuned.

Monday, June 8, 2020

The 'Scout' arrives, cannons, and warehouse

It's been a very long time since the last substantive update here, so I'll give a few with photos. The pandemic has been difficult here in North Jersey. We were one of the first hot spots in the nation. Our county saw the state's first death. I've been working remotely from the office since March, though the second job remains in-person, as it's essential. That would normally be a formula to get plenty of work done on the layout, but not so much in this reality. The boys are home from school, too, meaning all our extra time is devoted to working with them and other parental duties usually reserved for only non-school hours. Still, I've managed to get a few things done.

The 'Scout'

The Scout.
I've been waiting a long time to finally dive in and re-letter an engine. The PRR 1510 was the first candidate since I already painted over its old letters and numbers. Now it's the locomotive Scout, and I must say it looks very handsome in its new digs. I don't believe there's a prototype photo for Scout, so it's really up to the modeler with this one.

It retains pretty much everything from before, including the Rogers style smokestack and strap iron cowcatcher. I did add another coat of bright red paint to the cowcatcher to better align with the nameplate and tender letter accent color. Needs a little more detail work, but for now it's a great improvement. Next up will be one of the B&O twins.

Bring up the guns! And new warehouse.

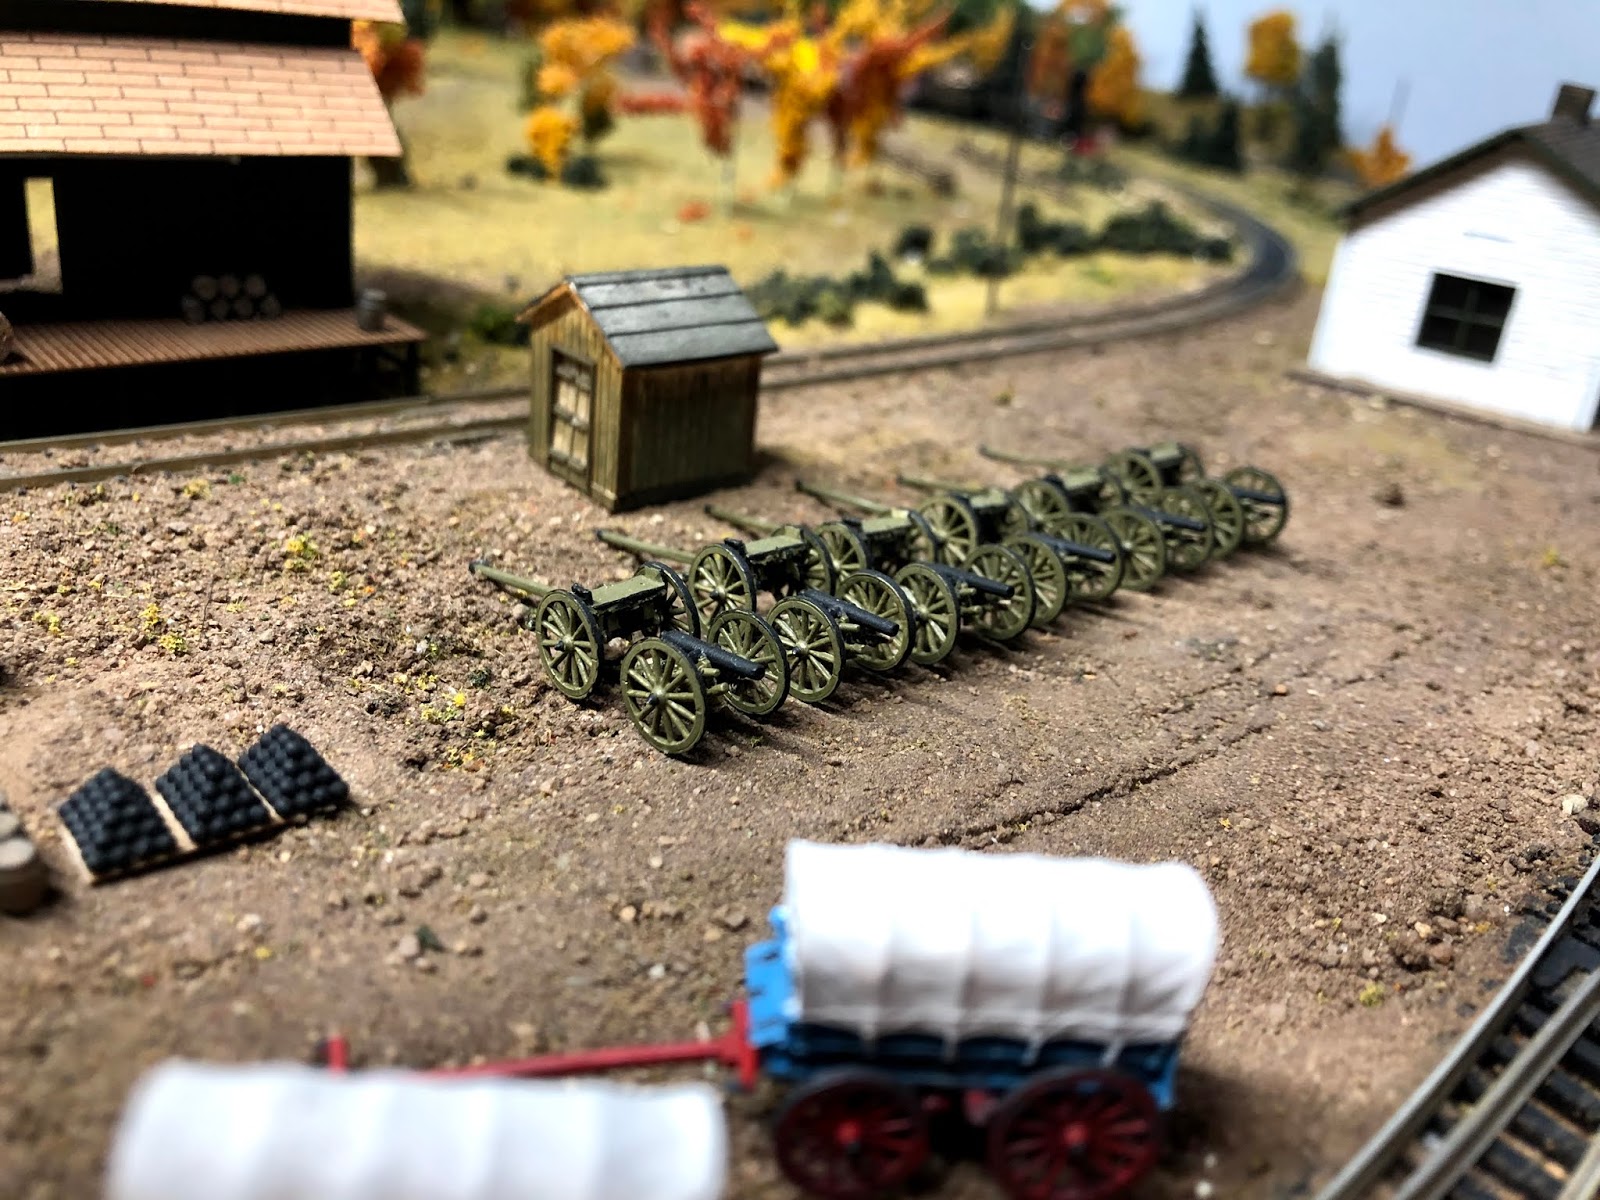
In my effort to avoid doing difficult track work or layout redesigns, I've focused on fleshing out the scenery and miniatures. This round brought six 3-inch ordnance rifles and caissons, three barbette rifles and platforms, and three stacks of cannonballs.

I thought I took some closeups of the barbette guns, but will have to come back with those later. Right now I have no place for them on the layout, but there is a photo of those guns in Alexandria guarding the port. They're definitely for use in prepared fortifications. I don't have anything like that on the current layout. If I make any major changes to it, maybe I'll add some kind of fort. Otherwise, these guns will have to hibernate until I can build the new layout next year or the year after.

The six-gun battery of 3-inch ordnance rifles are lined up in storage at the yard. This is one of the best reasons to model in N scale: volume. In most larger scales, six cannons and caissons would be a major expense. In N scale, this entire battery cost less than $100.

At first I was going to use the Parrott Rifle barrels, but decided to use the 3-inch ordnance since they were far more common during the Civil War.

In the background, you'll see a small coal shed kit I picked up, too. With a little weathering, it's the kind of building that adds necessary detail and depth. 

Probably should've cropped this photo better, but it is what it is. The new warehouse is the Micro-Trains Grain Co-Op kit. It has all the right lines for a structure of the Civil War era. And with a sharp coat of dark green paint with white trim, it fits very nicely. It's also the first two-story building on the layout.

I liked this one so much, I bought another a few weeks later super cheap on eBay. I obviously can't paint it the same color as this one. I'm still working out what I want to do there. Also under consideration is a bit of a modification to make them look a little more different, but again, still thinking about it.

The USMRR Armored Train Set

Below you'll see a couple photos of the U.S.M.R.R. Armored Train set from Micro-Trains Civil War Era line. This arrived a while back, but after I took a break from posting. So with all the catching up, I wanted to make sure these got into this post. The set is very nice, as is nearly all of MTL's stuff.

However, I'm a little disappointed in a few things. The first is that they included a conductor car / caboose, when a standard box car would've likely been the better fit. Next, the armored cars are decently detailed, but not as much as I'd hoped. A little weathering will go a long, long way with these. Lastly, the two Dictator mortars are nothing but plastic, when I was expecting either GHQ-quality or similar. The bores don't even extend far enough into the miniature so you can't see where it ends. They look very toy-like, rather than model quality I've come to expect from MTL. But overall I have no regret purchasing the armored train set. It'll go very well in a vignette on the layout somewhere.


Tuesday, November 12, 2019

Video update: Weathered boxcars, supply wagons, new army depot scene

It's been a while since my last post. So I wanted to prove I didn't give up on this thing. I finally got around to making a new video tour of the layout. Not much has changed since I posted it (you should subscribe), but I'll tell you a few upcoming things after the video.


Things you'll notice...

  • The Micro-Trains Civil War era boxcars have been given road numbers and weathering. It's makes such a difference. Also, they're all fitted with metal wheels. 
  • The tender load is tungsten putty covered in firewood I cut from leftover laser kits. 
  • Soldiers! I finished the Union Army supply wagons. They look great and add much-needed life to the layout. They were a breeze to paint, even if my eyes were screaming at me for trying to focus so small. I haven't gotten to adding more miniatures, but painting has started slowly. I'll have two more wagons (these from Good Ground Minis) soon.
  • The freight station and other scenic changes were covered in the last post. 
Things in the works... 
  • I found one of Mark Watson's ventilated boxcars. It's based on a post-war prototype from the Virginia and Truckee, meaning it won't be historically accurate on a Civil War layout. However, it's a good way to add variety to the rolling stock for now. 
  • More wagons and miniatures. 
  • If I'm adventurous enough, I'm going to paint over the Pennsylvania Railroad markings on the PRR 1510. It'll be a little scary since I really don't want to disturb any of the other ornamentation. But as long as the black paint matches up well enough, it'll be very cool to finally use the U.S.M.R.R. locomotive decals that have been sitting on a shelf. 

Wednesday, August 21, 2019

A little rearranging and some mud

A building relocation, wagons and mud make the depot section
look busier and dirtier--i.e. perfect.
Something just wasn't feeling right about the depot area on the layout. Even though having the freight station on the "far" side of the tracks opened it up a bit, it didn't have a natural flow to the buildings. I decided to experiment and I think it turned out well.

Before, the freight station felt left out, ignored.

Though it made a pretty scene, it didn't say "army depot."
The freight station is now on the same parcel of land as the passenger station. The area is more cramped, but I think that's fine for what I'm going for. 

I also added some mud (real dirt) to where the wagons and foot traffic would have worn away all the grass. Adding in some of the station workers and cargo, and it looks more like the bustling depot I had hoped to build.
Moving the freight station onto the same piece of land as the
passenger station was the right move. 

My hope is to supplement this scene in the next few months with another loading platform, more figures and cargo.

The figures are the biggest time sink, as I haven't yet started on any of the other miniatures I got from Good Ground and GHQ. I have to run out for some black spray paint to prime them.

But I'm already getting excited for how improved the whole scene will look with double the wagons, some officers, = a platoon of cavalry, and a company of infantry moving to their next destination. 

Monday, August 12, 2019

Civil War Trains: A Scene

Settling back into the routine today after spending a week down the shore. It was our first true vacation as a family. We had a great time.

Before I left, I spent a few minutes setting up a static scene on the layout, using the figures I had completed, as well as three of the four locomotives and a good number of the cars. The lighting wasn't great, and there needs to be far more figures (and more wood loads to cover the decoders) to give a decent amount of realism. But overall I thought this turned out to be a good overview of what I've accumulated since last summer. 


And just for fun, I threw the first image above into photoshop. It's not the greatest, but it changes the perception a little. I'll have to play around with the settings more to get that true wet-plate look.


Sunday, July 14, 2019

MTL Loco Shed done, Sibley Tents, new Balloon Stacks

The Micro-Trains Line Civil War Era Loco Shed is finally
built and weathered. The Sibley tents are actually more
weathered than they looked when I took this photo.
After what feels like months of it sitting on the shelf, half-built, I've finally finished the engine shed. It looks nice, considering I wasn't entirely sure how to make it look like "new, but worn" wood construction.

The funny thing is... I have nowhere to put it on the layout! I'd have to rip up some of the existing track and make room for a few switches and the sidings going into the shed. But honestly, I'm not sold on doing that any time soon. This layout was never going to be my dream layout, and putting "rip up track" effort into it is not going to happen.

Whenever I do use the engine shed, it'll be a really necessary piece of the layout. I'm still debating where and when my dream layout will be--Alexandria 1862, City Point 1864, either of those two, but a different year? I have time. But what I do know is that finding this building and the Sibley tents was pure luck on my part, and I couldn't be happier.

The wood piles are coming along, too. They may require another round of painting.

New Balloon Stacks


Bonnet Stack from Kaloon Creek Models.
I've been in contact with Eric Cox about his Civil War era smokestacks. And he did adjust the size a bit and reduced the height they sit on top of the engine boiler. But I haven't ordered any of the remodeled stacks from him yet because he's also working on updating his other stock items, which I plan to order in one big batch.

In the meantime, I tried out these balloon stacks from the Kaloon Creek Models shop on Shapeways. They look very good. They're closer to the smokestacks found on the William Mason. I'll definitely use these on at least one of my four engines. The only issue is that the hole for the engine's mounting peg is too big, as you can see from how it sits a bit cockeyed here. I'd have to use something to either make the fit more snug, or glue.

You'll also notice two things about the engine. First is that the handrail on the far side is broken. Need to get fresh super glue for that. The old stuff didn't hold. Second is I tried to shade in between the wheel spokes. Eh, I'll work on it.