Showing posts with label decals. Show all posts

Tuesday, August 31, 2021

Civil War era Pennsylvania Rail Road passenger coaches

Told you I was going to do some painting. I finally took the Bachmann Central Pacific coaches I got in that huge lot last year, stripped them down and repainted as Pennsylvania Rail Road cars. These are your standard Bmann Old Timer coaches. I custom mixed the paint to resemble something like a Tuscan Red, as I have concluded PRR didn't use dark green back then. The roof, trim, and trucks are the Testors rubber color, which is like a very dark brown. Decals are from the MicroScale Civil War era sheets. 


Apologies for not cropping the photos first. I'll need to do some minor adjustments to the couplers, both with height and to allow for a tighter turn radius. Right now at least one truck derails each time they go through the S-turn coming out of the loop. I should be able to file the coupler pocket a little wider. These coaches look sharp in person, and I can't wait to do more painting projects like this. I really missed it. 

Monday, August 31, 2020

New engine and the repainted Clarke, plus some buildings

It's a big deal whenever a new engine joins the roster, so this post is a big deal. There are usually about three to five Civil War era Atlas 4-4-0's on eBay at any given time, but they're almost always overpriced, at least for my wallet. So when a locomotive is available and in my range, I have to pounce. 

Atlas-4-4-0-Lima
Newest addition to the roster:
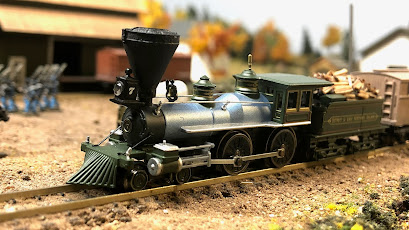
Atlas 4-4-0 #7 of the Detroit & Lima Northern. 

That's what led to the No. 7 being purchased. It's got a great Russia iron boiler jacket, and has minimal ornamentation. The latter is perfect for when I can repaint it. I don't have any engines with mostly blue livery yet. The No. 7 should look great. I picked up some new paints recently and the color scheme was definitely incorporated in that. 

One of the B&O twins is now the USMRR Clarke.

Speaking of paint, after a horrible misstep (more on that later), I was finally able to paint and decal one of the B&O twins and make it the USMRR Clarke. I'll have to figure out a better solution for covering the number plate on the boiler, and the drivers will need some paint work. But overall I'm very happy with this one. 

This was also one of the engines I wanted to experiment with Bullfrog Snot. You saw the video of the Scout pulling 27 cars after getting the treatment. Here's a pic of the Clarke under the knife a few weeks back. It's a very easy process, but tough to truly master right away. Practice makes perfect.  

New kicks.

But before all this, there was a disaster. I had rubbed off as much of the old lettering as I could, painted the tender and old name plate under the cab window, and added new decals that very closely match the original Clarke. Then came the clear coat of spray. UGH! I was too heavy on the first coat. The decals degraded and smudged. All that work, about four hours, down the drain. Some people I talked to online said it could have been the decals. They were an old sheet, so it's possible. 

The moment I was ready to scream.

Now for the buildings. It's easy to get too heavy with the non-dwelling structures, so I tracked down some houses that fit the era. You wouldn't believe the amount of time I spent debating what color to paint this first house. Most wood houses were white because that's what was cheap. But I needed something else, so a nice yellow with dark green trim was the choice. The roof was simple black paper, weathered with some diluted white paint. It may not be completely accurate for the period, but I don't anticipate many stitch-counters visiting my layout anytime soon. The second house is a simple white farmhouse, similar to what you'll see across many battlefields. I might add a stone faux-foundation to it using a stone pattern printed on paper and wrapping it around the pylons. 


Typical house that could serve nicely in the Civil War era.

The last building is sort of a kit-bash, even though I didn't actually bash two together. Ok so it's more like just a modification of a kit. Anyway... this was my first experiment with covering a building with paper to give a non-wood exterior. This one was brick. It's the same Micro-Trains co-op kit that was painted green and you can see in the background of all these photos. I covered a few of the windows, and did not add the loading dock or subroof. I did move the loading dock bay door down to ground level, which was very easy since the original door opening is now covered by the brick paper. Looks pretty good, but I can't put it on the layout as it stands right now. It's too noticeably-similar to the green building. But it'll fit nicely when I can build the bigger shelf layout with several "towns" or whatever they'll be. 

Sort of a kit-bash. Changed up some of the doors and windows,
and added a brick exterior to the Micro-Trains co-op. 

Since I'm not building that shelf layout for at least another 18 months, I'll keep working on the current layout to hone my amateur skills. Here's an overhead shot of the area I plan to work on. The wagons and escort are where I plan to build a road, bordered by either fences or stone walls. The 32-pounders are just too great to leave off the layout. Even if they don't exactly fit what I'm portraying here--What exactly am I portraying here anyway? I have no idea!--I'll need to construct some kind of earthen fortifications straddling the road. If I put the guns emplacements a few inches more to the left in this photo, that should look a little better than them being right on the little farmstead. Plus, if I can get a "fort" scene going on, that'll open up a ton of new possibilities for scratch building, like chevaux de frise, which I've been itching to build. 

Needs... more stuff.


I'll have a new update sometime in the next few weeks. Stay tuned.

Monday, June 8, 2020

The 'Scout' arrives, cannons, and warehouse

It's been a very long time since the last substantive update here, so I'll give a few with photos. The pandemic has been difficult here in North Jersey. We were one of the first hot spots in the nation. Our county saw the state's first death. I've been working remotely from the office since March, though the second job remains in-person, as it's essential. That would normally be a formula to get plenty of work done on the layout, but not so much in this reality. The boys are home from school, too, meaning all our extra time is devoted to working with them and other parental duties usually reserved for only non-school hours. Still, I've managed to get a few things done.

The 'Scout'

The Scout.
I've been waiting a long time to finally dive in and re-letter an engine. The PRR 1510 was the first candidate since I already painted over its old letters and numbers. Now it's the locomotive Scout, and I must say it looks very handsome in its new digs. I don't believe there's a prototype photo for Scout, so it's really up to the modeler with this one.

It retains pretty much everything from before, including the Rogers style smokestack and strap iron cowcatcher. I did add another coat of bright red paint to the cowcatcher to better align with the nameplate and tender letter accent color. Needs a little more detail work, but for now it's a great improvement. Next up will be one of the B&O twins.

Bring up the guns! And new warehouse.

In my effort to avoid doing difficult track work or layout redesigns, I've focused on fleshing out the scenery and miniatures. This round brought six 3-inch ordnance rifles and caissons, three barbette rifles and platforms, and three stacks of cannonballs.

I thought I took some closeups of the barbette guns, but will have to come back with those later. Right now I have no place for them on the layout, but there is a photo of those guns in Alexandria guarding the port. They're definitely for use in prepared fortifications. I don't have anything like that on the current layout. If I make any major changes to it, maybe I'll add some kind of fort. Otherwise, these guns will have to hibernate until I can build the new layout next year or the year after.
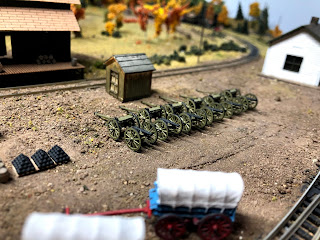
The six-gun battery of 3-inch ordnance rifles are lined up in storage at the yard. This is one of the best reasons to model in N scale: volume. In most larger scales, six cannons and caissons would be a major expense. In N scale, this entire battery cost less than $100.

At first I was going to use the Parrott Rifle barrels, but decided to use the 3-inch ordnance since they were far more common during the Civil War.

In the background, you'll see a small coal shed kit I picked up, too. With a little weathering, it's the kind of building that adds necessary detail and depth. 

Probably should've cropped this photo better, but it is what it is. The new warehouse is the Micro-Trains Grain Co-Op kit. It has all the right lines for a structure of the Civil War era. And with a sharp coat of dark green paint with white trim, it fits very nicely. It's also the first two-story building on the layout.

I liked this one so much, I bought another a few weeks later super cheap on eBay. I obviously can't paint it the same color as this one. I'm still working out what I want to do there. Also under consideration is a bit of a modification to make them look a little more different, but again, still thinking about it.

The USMRR Armored Train Set

Below you'll see a couple photos of the U.S.M.R.R. Armored Train set from Micro-Trains Civil War Era line. This arrived a while back, but after I took a break from posting. So with all the catching up, I wanted to make sure these got into this post. The set is very nice, as is nearly all of MTL's stuff.

However, I'm a little disappointed in a few things. The first is that they included a conductor car / caboose, when a standard box car would've likely been the better fit. Next, the armored cars are decently detailed, but not as much as I'd hoped. A little weathering will go a long, long way with these. Lastly, the two Dictator mortars are nothing but plastic, when I was expecting either GHQ-quality or similar. The bores don't even extend far enough into the miniature so you can't see where it ends. They look very toy-like, rather than model quality I've come to expect from MTL. But overall I have no regret purchasing the armored train set. It'll go very well in a vignette on the layout somewhere.




Tuesday, November 12, 2019

Video update: Weathered boxcars, supply wagons, new army depot scene

It's been a while since my last post. So I wanted to prove I didn't give up on this thing. I finally got around to making a new video tour of the layout. Not much has changed since I posted it (you should subscribe), but I'll tell you a few upcoming things after the video.


Things you'll notice...

  • The Micro-Trains Civil War era boxcars have been given road numbers and weathering. It's makes such a difference. Also, they're all fitted with metal wheels. 
  • The tender load is tungsten putty covered in firewood I cut from leftover laser kits. 
  • Soldiers! I finished the Union Army supply wagons. They look great and add much-needed life to the layout. They were a breeze to paint, even if my eyes were screaming at me for trying to focus so small. I haven't gotten to adding more miniatures, but painting has started slowly. I'll have two more wagons (these from Good Ground Minis) soon.
  • The freight station and other scenic changes were covered in the last post. 
Things in the works... 
  • I found one of Mark Watson's ventilated boxcars. It's based on a post-war prototype from the Virginia and Truckee, meaning it won't be historically accurate on a Civil War layout. However, it's a good way to add variety to the rolling stock for now. 
  • More wagons and miniatures. 
  • If I'm adventurous enough, I'm going to paint over the Pennsylvania Railroad markings on the PRR 1510. It'll be a little scary since I really don't want to disturb any of the other ornamentation. But as long as the black paint matches up well enough, it'll be very cool to finally use the U.S.M.R.R. locomotive decals that have been sitting on a shelf. 

Tuesday, May 28, 2019

Finished U.S.M.R.R. Passenger Coach

You may remember the difficulty I had repainting the Bachmann Old Timer coaches to wear the livery of U.S.M.R.R. passenger cars. It's been about two months since then. Frankly, I forgot to include the results in any blog post since then. So, here it is.


You'll see the color is now completely different than I had intended. The tan color wasn't going to work with the black lettering from Microscale. As much as I wanted to make this work to look like all the historical images of U.S.M.R.R. coaches, with light lettering on a dark background, it's better to make them look good with the options available.

After carefully stripping the car—I already ruined two of them using chemicals that were too harsh for the plastic—and scraping down the factory lettering, I began the primer coats of sunflower yellow by Testors. I almost exclusively use flat, since gloss looks too toy-like at this scale.

Once the body of the car was painted and dry, I masked off the roof and fascia just above the lettering board. Flat black was applied to the roof and grab irons.

The final touch was the decal work. Those suckers along the roof were long. Thankfully I was used to working with the decals at this point, or it would've been a disaster.

Maybe I got overzealous with the decals, but I think the number-over-shield in the center of the coach body looks really sharp. There are two small numbers on both end doors.

Overall, I'm very pleased with how the coach turned out. It was easily the most involved painting project I've done so far and I'm not sure if or when I'll have time to do the other coaches.

Other Odds n Ends


You can also see how I've added real dirt, gone over with a strong magnet, to the trackbed. It's only installed near the depot.

In the background you'll also see those Sibley tents I got on eBay. They're not painted yet, but from this distance and being out-of-focus, they look very nice.

And in the far background, you may notice it's different. That's because we had to move the table into the other side of the basement. The corner this was previously in was where we'd get some water during bad stretches of drenching rain. It was such a pain to move the table, I decided to get it up to dry ground. It also forced me to clean up the basement this weekend, so it worked out for everyone.

Till next time...

Monday, April 8, 2019

Adding decals to the boxcars

I started writing this post over a week ago, when I was already a week into applying Microscale decals to a few of the boxcars. Going into it, my biggest fear was destroying the decals in the process. I haven't applied a decal on anything since my last model car in, oh, about 20 years. As I started, it soon became evident my eyesight isn't what it was way back when. Not only were the decals small and on light-colored backing paper, but the numbers are spaced so close together on the sheet that you need to be almost perfect on every cut with the blade.

LOTS of MicroSol is needed when dealing with the surfaces on these cars.
After a few rounds, I got more comfortable and figured out a few techniques that worked best for me. I liked using toothpicks to adjust the positioning, since they're not sharpened to a point like the razor, but small enough to control just a corner of the decal at a time. Other tools were Q-tips, small paint brushes, and a lot of patience.

You'll notice some of the decals were damaged either as I was preparing them, or once they were on the model. Since the surface of these boxcars are not smooth gloss, I used MicroSol. That required extra care and speed to apply the decal without manipulating it too much. They started to get very soft the moment the MicroSol hit the decal and would tear easily.

Those numbers are even closer in person than they look here.
A frustrating issue for me followed a suggestion from the Microscale instructions. It said if you can't see the white decals well enough to cut them cleanly, you can color the back side of the paper with a dark ink marker. So I did that and the decals showed up great on the backing paper. However... something must have happened when the ink soaked through the paper, because it was MUCH more difficult to get the decals off the paper after soaking them in water. The ones without the ink slid off with little effort. Just a heads up to those out there considering using these decals. They work great, but practice, and expect to lose a few along the way.

I'll have a follow-up post in a few days.

Passenger Coaches Fiasco


After realizing the passenger car decals were only in black, I had to rethink the paint scheme for the coaches I'm trying to make from the old Bachmanns. First, I used too-strong of a paint remover. The plastic was damaged and now looks rough. I still have another three coach bodies to use, but it's still frustrating. Stay tuned for more.

A Few Parting Shots for Today


I don't post enough photos that are just for fun. I'll start doing that more.

From above. Yes, the track is still the worst part of all this. It's also the biggest
single expense to replace. Those two things are related.
The paint can is holding down the track on the bridge that needed re-gluing.
Evening freight train rolls into the depot.